Adding Categories
Categories in Asset Essentials are used to classify and organize both Assets and Parts. Examples of categories may include Electric, Plumbing, or HVAC. If you have more than one Site, it is recommended to keep a consistent Category list across all Sites. Categories can be built in a hierarchy structure, with layers of Categories and Subcategories, but it is best practice to start with commonalities across all Sites, and start your list with the top level categories you might need.
Watch the Video Tutorial:

How to Add a Category
- Click on the Admin menu icon, then select Configurations.
- In the Asset section, click on Categories.
- Click the New button.
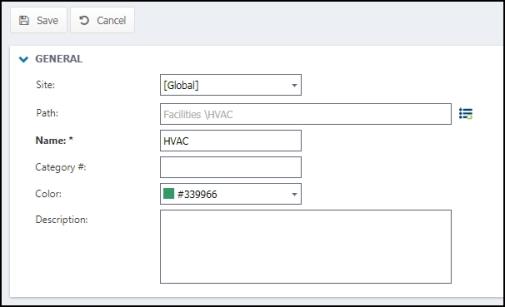
- If your account has multiple Sites, select a Site from the drop down menu.
- If this will be a top-level category, do not select a Path. However, if this is a subcategory, use the Path field to attach it to the appropriate category:
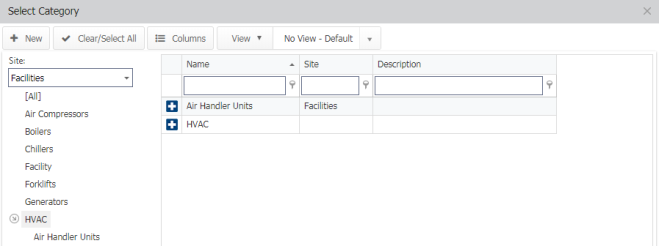
- If this is a subcategory, click on the menu icon (
 ) to open the Select Category window.
 - Use the Category tree on the left to click on the top level category needed. This will show the top level category as well as any associated subcategories in a list. Click the plus sign icon (
 ) next to the category you need.
 - This will populate the top level Category, and if applicable, the subcategory you have chosen, in the Path field. For example, if you are creating a Category you want associated with the top level Category of HVAC, you would just see "HVAC\" in the Path field. However, if you selected the subcategory of Air Handler Units in your Path, you would see "Facility\Air Handler Units\". This creates the hierarchy of Categories.
- If this is a subcategory, click on the menu icon (
- Enter a Name for the Category. This is the only required field.
- Optionally, you can also enter a Category #, select a Color, and enter a more detailed Description.
- Click Save.